Console commands are commands that can be used in-game in order to do specific things with the server or game world. Along with being able to change certain world settings such as rain or weather conditions players are able to kick others and close or save the server through console commands. We will show you how to enter console commands in Project Zomboid and a full list of all of the available commands for multiplayer.
The information in this guide includes information for older versions of the game. To see how to access the admin panel and options whilst in a server on Build 41 of Project Zomboid, click here. (or scroll to the bottom of the page)
How to Open the Console in Project Zomboid
There isn’t a command console per se in Project Zomboid. To enter console commands, the player is able to type the console codes directly into the in-game chat. To open up this in-game chat press the T key on your keyboard. Once this part of the UI is opened up the admin can input their console commands directly into the chat to have them take effect. Note that you can only access the in-game chat whilst playing a multiplayer game in Project Zomboid. These server/admin commands can’t be used in single player. For cheating or using commands in single player check out this guide.
Using Server/Admin Commands Without the Console
Once you start your very own server through the Steam version of the game you will be the admin of the server. Along with being the admin you will get your very own server control panel that you can do basically everything from without needed to input console or server commands manually. Press the ESC key while you are in-game and select the option that says “ADMIN PANEL”.
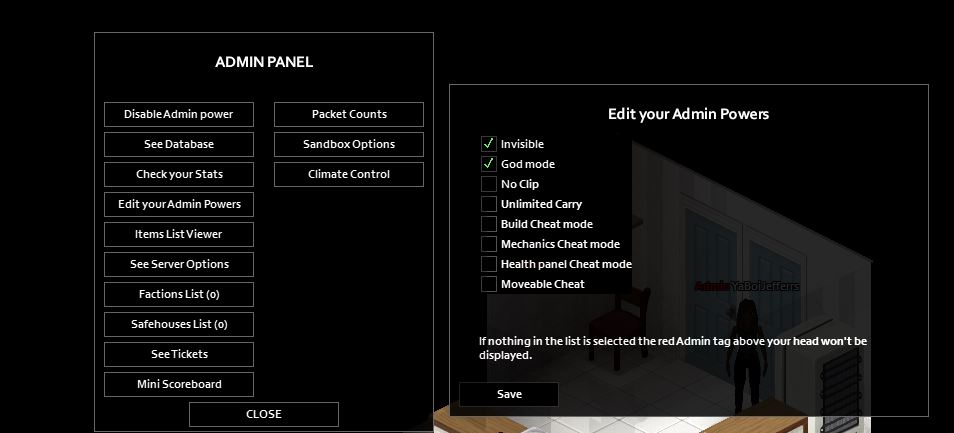
Once you’ve opened up the admin panel you can see a bunch of different options that are available to you as the admin of the server. Along with general admin ‘Powers’ such as invisibility and god mode and the like there are a range of different other admin controls you’ll have.
You have the ability to see all players and kick or ban them from this menu. As well as being able to add experience to yourself, change server options such as loot levels and zombie counts and see all factions currently active on the server.
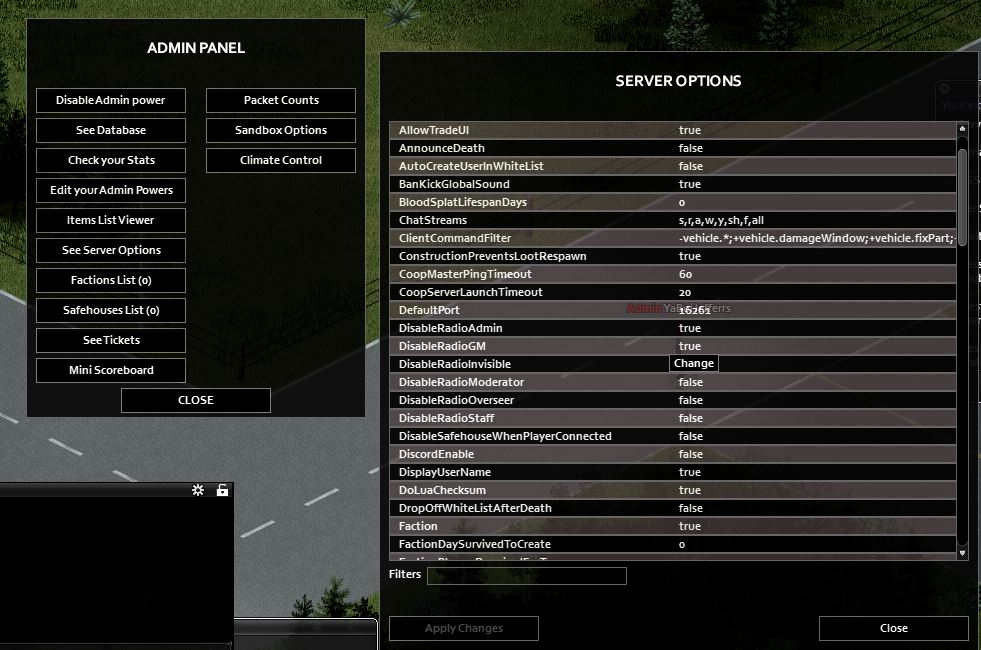
Server Options
You can change basically everything to do with running and operating the server with the Server Options menu. Here, you will see a bunch of different options from allowing trade to displaying other player’s usernames. Some of the more important and relevant things you can change in these server options are:
- Global Chat: Determines whether or not the global chat is available on the server
- MaxPlayers: Determines the maximum amount of players that can join the server at any one time
- PVP: You can toggle PvP (Player versus player) damage on or off
- PlayerSafehouse: Allows or disallows players the ability to claim a safehouse
- VoiceEnable: Allows local voice chat. If you’re having server lag issues disabling voice chat generally makes for a smoother experience.
Opening the Admin Panel in Build 41+
With the release of the new version of Project Zomboid there have been some changes to the way that the admin panel is accessed. There are now more steps that you will have to go through in order to give yourself admin access. Even if you are the host of the non-dedicated server you will still have to give yourself access in game. There are two different servers in which you can play Project Zomboid multiplayer, dedicated or non-dedicated.
Opening the Admin Panel in a Non-Dedicated Server
A Non-dedicated server is the server that you run if you are starting a game through the game’s main menu. This server is started locally by your machine and can will end when you close your game. If you choose ‘Host’ from the main menu ,this is a non-dedicated server.
Once you are in the server and it is running you will not be able to pause the game and see an admin menu, you will have to set yourself as an admin first. To do this you will have to type the following phrase into the chat feature of the game:
- /setaccesslevel “yourSteamname” admin
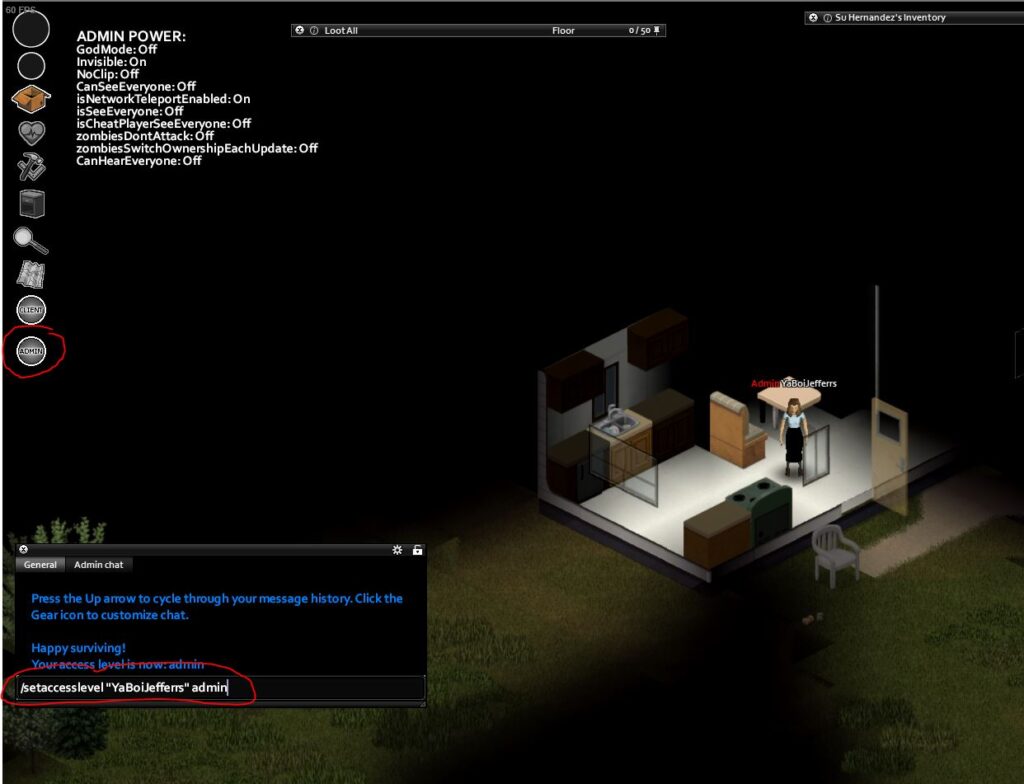
When you have typed that in successfully you will see some admin options immediately appear on the screen. Now that you have access to the admin options there is another icon on the top left which reads ADMIN. Select this icon to access the admin panel in Build 41!
Remember that your Steam name is case sensitive. Some have reported issues when they are using non-standard characters in their Steam name as well. But once they changed their Steam name they could access the admin panel using the above command as normal.
For Dedicated Servers
Those that are using a dedicated server through a provider or hosting it from their own machine will have to do more-or-less the same thing. The problem is when you log on to your dedicated server you are not the host but just another player. For this reason you will have to type the command into the console. (this is the black window with text you can see when you start the server)
Now that you’re in the server you just have to type the same command but without the / as we are not in the text chat box. You can enter command directly here.
Awesome guide.
Everything works perfectly.
My crew will be eating good tonight lol
Hmm, pre build 41 I seem to recall that one of the admin cheats, some combination of godmode, noclip and invisible I think, allowed you as an admin to move really fast on foot, which made it easier to view users on the server
Any idea if that is still possible? I’m not seeing anything equivalent in the ‘Edit your Admin Powers’ UI.
Hey Johannes,
Yes I remember player back in the day with my friends as well and having something like this! Completely forgot about it until you mentioned it now. I haven’t found anything like that it the new Admin panel yet though.
command worked and im getting the “your access level is now admin” message but there is 0 admin panel to click under the client button
Hey Matthew,
First of all, beautiful email address. Are there any special characters in your steam name? That’s been reported to cause issues with this. Try copying your name directly from your Steam profile and pasting it into the game’s console. (CTRL + V does work on the in-game chat) Sometimes the chat says you have been granted admin access but it’s not actually true. This Reddit post might have the solution you’re looking for as others are talking about the same problem.
Hope that helps
replying on my much more appropriate email now. after changing from “Matt.” to “Matt” , nothing changed then i changed it to “matt” and it worked
Cheers for your help jeff
Hahaha, much better thanks.
Hey glad I could help you out. Enjoy the game, remember to watch your back!
mhm i got no panel, really thanks D:
I’ve just updated the guide to show instructions for Build 41!
Merry Christmas!
Thanks. 😛
Happy Holidays
help when i give myself admin and press esc it doesnt show the admin panel option
Hey Andre,
I’ve just updated the guide for instructions on opening the admin panel up post build 41. I hope that helps you!
Merry Christmas 😀